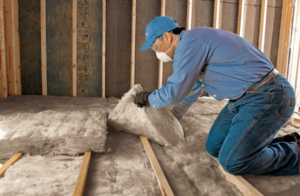
Insulation Removal is a process that can be best left to the professionals. It is not a DIY project and can be very hazardous to your health and indoor air quality.
Often old insulation is damaged by pest infestation, water leaks or mold growth and must be removed. Replacing it with new and fresh insulation will ensure improved energy efficiency and reduce the reliance on heating or cooling systems. Visit Our Website to learn more.
Insulation removal is a complex task, and it’s a job best left to professionals. This is because old insulation can lead to health risks, poor energy efficiency, and even mold and pest infestations. In addition, removing insulation can be dangerous for DIYers and require specialized equipment like high-powered vacuums and safety gear. Moreover, it’s essential to take into consideration that the cost of renting equipment and disposing of waste insulation can add up.
Thankfully, there are several easy-to-use tools that can help you remove the old insulation in your home. These tools include:
1. Insulation Vacuum: An insulation vacuum is a specialized machine designed to remove both fiberglass and cellulose insulation from homes. This type of device works by using a powerful suction to pull the insulation away and then deposit it into a special waste bag for disposal. You can find these devices at home improvement stores or online.
2. Plywood Sheets: This material provides a stable surface to walk on over the attic floor joists, making it easier and safer to remove old insulation. It also helps prevent the spread of dust and other irritants throughout your home. In addition, plywood sheets can prevent you from walking over areas you’ve already cleaned, which can redistribute the particles.
3. Cellulose Removal Tool: This is a versatile tool that can be used to cut rigid foam insulation, and it comes with a snap blade for fast cuts. Its durable, lightweight design makes it easy to use, and the angled tip can reach difficult spaces. If you’re removing a large amount of insulation, consider getting a pair of these cellulose removal gloves to protect your hands from the dust and allergens.
4. Wire Strippers: This tool is useful for removing old insulation from electrical wires. It has a sharp, durable blade that slices through insulation with ease and is comfortable to hold. Be sure to position the blades correctly to avoid nicking the conductors. The handles are also easy to grip, which makes this tool a great choice for removing old insulation in hard-to-reach spots.
Designed for fast removal of insulation from attics and sidewalls
Insulation plays a critical role in keeping homes and commercial spaces warm. However, it can become contaminated with mold or rodent droppings over time. When this happens, it is necessary to remove the insulation and replace it. However, this can be a dangerous project for DIYers to undertake alone. In order to ensure your safety, it is best to hire professionals. The experts will know how to handle the insulation safely.
The first step in the process of removing attic insulation is to clear out the area. This helps to prevent contamination and makes navigating the attic easier. Additionally, it is important to check the electrical wiring in the attic before beginning. Live wires can pose a risk of shock if they are accidentally touched during the insulation removal process. It is also crucial to turn off the power and disconnect any junction boxes before beginning the process.
Depending on the type of insulation in your attic, you may need to equip yourself with a variety of tools and equipment. This includes a ladder, a garden rake or pitchfork, a commercial or HEPA-filtered vacuum, and sturdy waste bags. It is also crucial to wear protective gear, including gloves, goggles, and a respirator. You will also need a utility knife to cut any oversized batts into manageable sections for removal.
While removing attic insulation is not a complex task, it can be a messy one. The attic is often filled with a combination of mouse droppings, rodent fur, and formaldehyde binders. It is also common to find asbestos and vermiculite. These contaminants can pose a serious health hazard if inhaled or ingested, so it is imperative to use proper safety techniques.
The cost of removing attic insulation varies widely depending on the square footage of the attic, the type of insulation, and the difficulty of accessing certain areas. The price of removing fiberglass batts is the lowest, while spray foam is the most expensive. A professional can save you money by ensuring that the job is completed efficiently and effectively. They will also be able to provide advice on installing new insulation that will increase your energy efficiency.
Recyclable material
Insulation is made of recycled material, which helps to lower the home’s energy costs and reduce its carbon footprint. This is great news for homeowners who care about environmental sustainability and want to save on their utility bills. However, many people forget about recycling their old insulation when they renovate or remodel their homes. This is a mistake because the improper disposal of insulation can cause environmental problems. It is best to hire a professional to dispose of old insulation properly.
In general, most types of insulation can be recycled. Fiberglass, mineral wool, and cellulose can be recycled at specialized facilities. In fact, some cellulose insulation is actually made from recycled newspaper. This helps to save on the cost of raw materials and energy in manufacturing, and it reduces landfill waste. These types of insulation are also eco-friendly because they are fire resistant and non-toxic.
It is important to keep in mind that when attempting to recycle or reuse old insulation, you must remove it from the attic and dispose of it properly. This is because contaminated insulation may be a home for rodent urine and feces, which can lead to the development of mold and other health hazards in your home. In addition, contaminated insulation may be a breeding ground for rats, squirrels, and other pests. In these cases, removing and replacing your old insulation is the best way to improve the air quality in your home and prevent pests from entering.
Removing old insulation is also a good idea because it can help to improve your home’s energy efficiency. This is because older insulation can be ineffective in regulating your home’s temperature, which leads to high heating and cooling costs. Replacing your old insulation with newer, more efficient materials can significantly lower your utility bills and make your home more comfortable.
While it is possible to do some DIY projects at home, a professional should be hired for old insulation removal. This is because the process can be time-consuming and complicated. It is also important to hire an experienced contractor who knows how to safely remove and install insulation. Moreover, the process involves careful examination of the insulation to ensure that it is free of moisture and debris.
Safety first
Whether you need to replace old insulation due to a rodent infestation, water damage, or general wear and tear, it’s important that you take the necessary precautions to ensure a safe and effective removal. Taking care of the task at hand requires proper planning and preparation, including identifying the type of insulation and ensuring that you have the right tools to tackle the job.
A powerful insulation vacuum with a specialized attachment is ideal for removing loose-fill insulation like cellulose and fiberglass. It will help to quickly suck up the material and minimize mess. Having heavy-duty waste bags to collect the debris is also essential. Other tools that you will need include a stud finder to locate wall studs and minimize damage when cutting into walls, a utility knife for tackling batt and roll insulation, and a long-handled vacuum or pry bar for removing insulation from crawl spaces.
When preparing to remove blown-in insulation, it is crucial to wear protective gear and work in a well-ventilated area. Dust and other insulation materials can cause irritants if they come into contact with your skin or eyes. A mask or respirator can protect against these irritants and prevent respiratory problems. It’s also a good idea to wear a pair of safety gloves and goggles to protect yourself from cuts.
In addition to ensuring that you have the right equipment, it’s also important to prepare your workspace. The insulation removal process can create a lot of mess, so it’s best to have a clear work space with no furniture or other items that could get ruined. It’s also a good idea for workers to wear long-sleeved shirts and pants to protect their bodies from insulation particles.
After removing the insulation, it’s vital to inspect the attic or wall cavity for any issues that need addressing. For example, rodent droppings can eat through load-bearing beams and weaken the structure of your home. Additionally, mold and mildew can contaminate new insulation or cause health issues. By assessing the condition of the attic and addressing any issues immediately, you’ll have a clean and safe space for installing new insulation.